Showing posts with label Sewing. Show all posts

Saturday, May 17, 2008

Softie swap continues

Today I received my softie swap! It’s not that I was surprised that my partner is Tzik as my daughter pulled names out of a bowl to make partners and I arranged the swap, but I didn’t have a clue what she was going to make and boy did she surprise me.
It arrived by special delivery, she came over with the kids, a jar of freshly baked home made health cookies and this:

Accompanied by this fabulous card, it’s not stamped, it’s drawn by hand, well copied from somewhere but as she says one has to know how to copy properly, which is true, this one is perfectly done and embellished.

Inside the box I found not one but a pair of softies!

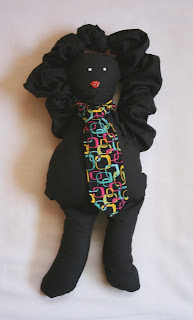
This gorgeous creature, my kids call Harry, all dressed up with a tie and all.

And his companion my kids call Hermione, all fancy with her pearl necklace

We decided they were going to be door keepers, Harry is watching our front door while Hermione will watch each bedroom door for a week. The kids originally suggested that I sew a few more for each bedroom door but very quickly I told them this wasn’t going to happen, so Hermione is going to travel from door to door.

On top of all this, I also received this gorgeous Amy Butler fabric which I already have plans for.

This is what I call a good day! What a way to spend one's Saturday morning and this is the cutest softie of them all, her 11 months old son and his 6 teeth.


Tuesday, May 6, 2008

Softie swap

I led a softie swap in one of the forums I take part in, I don't really have any real experience with making them but I thought I have enough sewing experience to try. I wanted to make an original and unique one, I didn't want to use a pattern from a book or from the Internet so I started out sketching what I wanted my finished softie to look like and it came out quite masculine looking.
I knew I wanted to use fleece for the body as I love it, it's soft and warm and compliments a softie don't you think?
The face elements are made from felt and sewn by hand, when I was finished embroidering it I noticed that my softie has a girly expression…

At that stage I accepted the fact that my HE was going to be a SHE, so I decided to dress her in overalls instead of the shirt and tie I planned at the beginning. My life story by the way, I always end up with something different then the original plan and I always find myself improvising.
Last time I made trousers I was pregnant with my eldest and that was almost 16 years ago, so I searched the Internet for patterns and changed the proportions to fit my softie; they are made from a cotton fabric with suspenders connected with buttons on both sides and as she’s a happy sort of softie she’s holding a pink felt heart.

She is 40cm' (15.5 inch) long from head to toe. Speaking of toes, she has pink "shoes".

I was so happy to send her to Hagit, a very talented woman who's art I appreciate, her work can be seen on Flickr at: http://www.flickr.com/photos/hagit/
I usually have no problem sending off what I make for swaps but my daughter had quite a problem parting from this one so I'm going to have to make at least one more which isn't going to be a problem as I really enjoyed this project.
Here she is:

Hagit I'm so glad you like her, hope she makes you happy and you live happily ever after (-:

Wednesday, March 19, 2008

It's PURIM!!

Purim is a Jewish holiday that commemorates the deliverance of the Jewish people of the ancient Persian Empire from Haman's plot to annihilate them, it's celebrated annually and is characterized by giving mutual gifts of food and drink, giving charity to the poor, a celebratory meal, and other fun customs that include drinking wine, wearing masks and costumes, and public celebrations.
We like to make our own costumes, it's usually the kids that come up with ideas and I carry them out into something they can wear.
Besides my 3 kids, I usually also create a costume for Tamara, Guy's friend ever since kindergarten, as they dress up as a pair.
This year Raz wanted to dress up as a tea bag (-: I made it from paper cloth as it's quite see-through, there are 3 layers of the material, one for the back whereas the other 2 are sewn together at the bottom and filled with little pieces of black wool to create the tea leaves effect. All 3 layers are sewn together on the sides and shoulders. The tag is made from paper and cardstock to resemble the real labels that are interwoven in her hair.


Guy and Tamara wanted to dress up as a painter and his palette. To create the palette I used an old cotton sheet and sewed pieces of colored felt onto it.

For the painter we took an old shirt from daddy and smeared it with acrylic colors, painted a canvas the same colors that are on the palette, put a French baret hat on his head (thanks Ifaat!) and drew a black mustache on his face. The paintbrush is made from a black colored cardboard cylinder stuffed with newspapers on one side and a real paintbrush glued in the other side.


Each year I think, WOW we did it again, what will they think of next year? They always manage to surprise me. Last year they dressed up in a costume we named "crazy chef frying a sunny-side up egg".

This is Guy and Raz when they were 3 years old.


And as I'm in a nostalgic mood today, this is me and my brother, 38 years ago in costumes my mother made for us.

Happy holiday to all those celebrating!!

Saturday, March 15, 2008

Japanese Knot bag

Every day when I go out of my office to have lunch I take a few necessities with me, I'm a woman what can I say, my men colleagues just put their wallet in their pocket, I need my cellular phone, my wallet, my company name tag and Kleenex as I’m forever with a cold or some kind of allergy. Some of the above I put in my pockets, some I carry by hand, when I’m wearing a dress and have no pockets I have my hands full, this has been going on for years until I came across this fabulous tutorial for a Japanese Knot bag, just what I need!
Adilee posted the link in one of the forums I participate in as part of the bags swap we're having.
I love it, it’s just what I was looking for, my new “lunch bag”.


Friday, March 7, 2008

Pillowcase bag

I saw a pillowcase bag on Maya's blog (in Hebrew), it's one of Martha Stewart's classics (this one is in English of course).
My mother has a shelf full of pillowcases she brought from the USA thirty years ago, they are quite old fashioned but I thought with some embellishments this one could work as a bag. The basic bag is very easy to make (see Martha's illustration) and I suppose if you make it out of a gorgeous pillow case it wouldn't need any embellishments at all, mind you if I had a gorgeous pillow case I'm quite sure I wouldn't want to cut it up and make a bag out of it (-:
The henhouse met on Thursday and it was a good opportunity to try it out, thanks girls for your support as always, the laughs and the excellent food!
As the pillow case I used needed additional zest I created a pocket in front and added some ribbons and a gigantic button that did the trick and gave it the look I was looking for. I also created longer straps as I think it's more convinient.
I'm pleased, it will make a sweet summer tote, now I have an urge for some more totes, comming soon (-:

Thursday, January 24, 2008

Needles notebook

I sent a birthday present to T42 from one of the forums I take part in, I love her creations and especially the way she combines needle craft in many of them, that's why I chose to make a needle notebook for her and took the opportunity to take pictures of the process so I can post it here. It's the same as the black and white one I gave to Michal and posted last week.
T42 is the one that took the picture of the completed notebook as I sent it off before I had the chance to take a proper picture so thank you T42!
First choose your patterned fabrics, I like using 2 different ones, one for the outside and a different one for the inside but you can use just the one pattern.
Start out by cutting out 2 pieces of fabric, size 15X20cm (6X7.8inch) each.
Cut one of the pieces in half, now you have 1 piece size 15X20cm’ (6X7.8inch) and 2 pieces 15X10cm’ (6X4inch).

Cut out relatively thin and light iron-on interface, a piece for each piece of fabric, cut the interface a little bigger than your fabric to make sure it’s all covered. The interface will prevent the fabric from fraying at the edges.

Take out your ironing board, lay out the fabrics on the interfacing, note the glossy glue on the one side of your interfacing, you need to have the sticky side up and the left side of your fabric on top of it.
Iron just enough to make the fabrics edges stick to the interface (5-10 seconds), now flip and iron from the back side. Do the same with all your fabric pieces.

After it cool’s off trim the edges of all 3 pieces.

Take your 2 small pieces and sew the length just on one side. I used a dark color thread so you can see it better but rather have your thread the same color as your fabric.
Lay both small pieces on top of the larger piece (the right side of the fabric on the right side of the fabric) their sewn side turning inside and sew all round.
I added 2 pieces of ribbon on both sides before sewing together so I can later close the notebook by tying a bow.

Now turn it over to the other side, you will get 2 pockets.

Iron both sides, inside and out to flatten it.

Cut out 2 pieces of double sided thick interface and place each piece inside each pocket.

Iron from both sides until it sticks; this will create a harder cover.

Inside your notebook sew a piece of felt; I used the blanket stitch round the felt.

Embellish your cover and there you have it.

Next time I’ll show you how I embroider letters.

I'm going away for the weekend so if you have any questions I'll be able to answer in a couple of days. Have a great weekend!

Friday, January 18, 2008

A present for a dear friend

Yesterday we celebrated Ruti's and Michal's birthdays. For Ruti I made a fleece blanket and knitted round it and forgot to take a picture.... For Michal I made a pin cushion with pins decorated with polymer clay flowers, a matching needle book in a black and white matching fabric bag. So many birthdays in winter, the next one is mine (-:


Michal's card


And Ruti's card

Friday, January 11, 2008

Fleece & fabric scarf

How about a project for the weekend? It's the coldest day of this winter so far and is there anything cozier than fleece? You already know I am crazy for scarves so a combination of the two suits me just fine (-:


A few weeks ago I made a fleece scarf with fabric on both sides


Then I saw Aliner’s scarves, and I was inspired to make one using more than one fabric. Aliner creates the most magnificent things from fabric, I love her work visit her ETSY and her blog in Hebrew, even if you can't read it just look at the photographs of her work.

Start out measuring a 1.50m’ X 35cm’ (60 inch X 14 inch) piece of fleece, you can use a few colors of fleece; here I combined a piece of cream color as well as the main olive shade I used.

You can make it wider if you like wide scarves; take into account that the width measurement divided by 2 will be the final width of your scarf. Lately I like my scarves not so wide…
Choose your patterned fabrics, I purchased mine at Artishok, you can use as many as you like.


Cut out relatively thin and light iron-on interface, a piece for each fabric, cut the interface a little bigger than your fabric to make sure it’s all covered. The interface will prevent the fabric from fraying at the edges.
Take out your ironing board, lay out the fabrics on the interfacing, note the glossy glue on the one side of your interfacing, you need to have the sticky side up and the left side of your fabric on top of it (don’t you just hate it when you end up ironing the sticky side and it sticks to your iron?)


Cover with a thin cotton cloth and iron just enough to make the fabrics edges stay on the interface (5-10 seconds), now flip and iron from the back side. Do the same with all your fabric pieces.


After it cool’s off trim the edges.


Assemble all the pieces together with pins any way you want just make sure you lay the right side of the fabric on the right side of the fabric beside it.


Sew all the pieces together so you get one long piece.


Iron the stitches open, do it with a relatively cool iron and keep the iron mainly on the fabric and not the fleece as we tend to refer to fleece as fabric but it’s not, no fibers there, it’s closer to plastic then it is to fabric, it’s synthetic and can actually melt from the heat of the iron.

Now fold your scarf in half, all length, making sure you lay the right side of the fabric on the right side of the fabric, so that you get a long scarf about 17cm’ (7 inches) wide.
Sew all the way around leaving the bottom part open so you can turn your scarf to the right side.

Now turn it.


Cover with a thin cotton cloth and iron gently just to flatten it a little.

Now hand stitch the bottom part you left open.

And there you have it.
Good luck and enjoy (-: